
Hey there, homeowner! Have you ever flicked on a light switch and wondered if your home’s wiring is up to the task? Rewiring a house isn’t just a fancy upgrade—it’s often a lifesaver. We’ll walk you through how to rewire a home safely, step by step. Whether your old wires are causing flickering lights or you’re just modernizing your space, understanding the process can help you make smart decisions.
Think about it: our homes rely on home electricity for everything from charging phones to running appliances. But outdated wiring can lead to big problems. That’s why many folks choose to rewire—to boost safety, improve energy efficiency, and even increase home value. In the sections ahead, expect clear explanations, practical tips, and a focus on doing things right. We’ll cover everything from preparation to final checks, always prioritizing safety. Ready to dive in? Let’s get started!
What is House Rewiring?
So, what exactly does it mean to rewire a house? At its core, house rewiring involves replacing the old electrical wires, outlets, and sometimes even the entire system with new, modern components. It’s like giving your home’s nervous system a fresh start. The purpose? To ensure your electricity flows safely and efficiently, without the risks that come from aging or faulty setups.
You might not think about your wiring until something goes wrong. But imagine this: wires installed decades ago weren’t designed for today’s gadgets. Rewiring updates everything to handle modern demands, like smart home devices or high-powered kitchen appliances.
Now, how do you know if it’s time? Look for common signs. If your lights flicker randomly, that’s a red flag— it could mean loose connections or worn-out wires. Frequent breaker trips? That’s your system saying it’s overloaded. Other clues include buzzing outlets, discolored wall plates from heat, or even a faint burning smell. Spot these, and it’s wise to act fast.
The benefits are enormous. First off, safety jumps way up—reducing risks like fires or shocks. Efficiency improves too, potentially lowering your energy bills. Plus, a rewired home meets current building codes, which is a big win if you’re selling or insuring your property. Have you checked your home’s wiring lately? It might be time for an assessment.
Why Safety Is Crucial When Rewiring a House
Let’s talk straight: messing with electricity is no joke. Improper wiring can lead to electrical fires, which account for thousands of home incidents each year. Shocks? They range from mild zaps to life-threatening jolts. And don’t forget property damage— a single spark could ruin walls, furniture, or worse.
That’s why following electrical codes isn’t optional; it’s essential. These standards, like those from the National Electrical Code (NEC), ensure your setup is safe and reliable. They dictate things like wire types, circuit loads, and grounding rules. Ignore them, and you’re playing with fire—literally.
Hiring professionals brings peace of mind. Licensed electricians know the ins and outs, spotting issues you might miss. They handle permits and inspections, saving you headaches. But if you’re tempted by DIY to cut costs, consider the risks: one wrong connection could void your insurance or cause injuries. Ask yourself—are you confident with voltage testers and circuit mapping? If not, pros are worth every penny.
Tools and Materials Needed for Rewiring a House
Before you even think about starting, gather your gear. Having the right tools makes the job smoother and safer. Let’s break it down.
Here’s a straightforward list of essential tools you’ll need:
- Wire cutters: For snipping wires cleanly without fraying.
- Voltage tester: Crucial for checking if power is off—never skip this!
- Screwdrivers (both flathead and Phillips): For securing outlets and panels.
- Fish tape: Helps pull wires through walls without major demolition.
- Wire strippers: Removes insulation precisely, preventing nicks.
On the materials side, stock up on:
- Electrical wires (like NM-B or THHN types, in appropriate gauges).
- Outlets and switches: Modern ones with grounding features.
- Breakers: Matched to your panel’s specs.
- Conduit: Protects wires in exposed areas.
- Junction boxes: For safe wire connections.
Don’t forget safety gear. Gloves shield your hands from shocks, safety goggles protect your eyes from debris, and insulated tools add an extra layer of protection. Imagine fumbling with live wires without these—scary, right? Invest in quality items; they’re your first line of defense.
Preparing Your Home for Rewiring
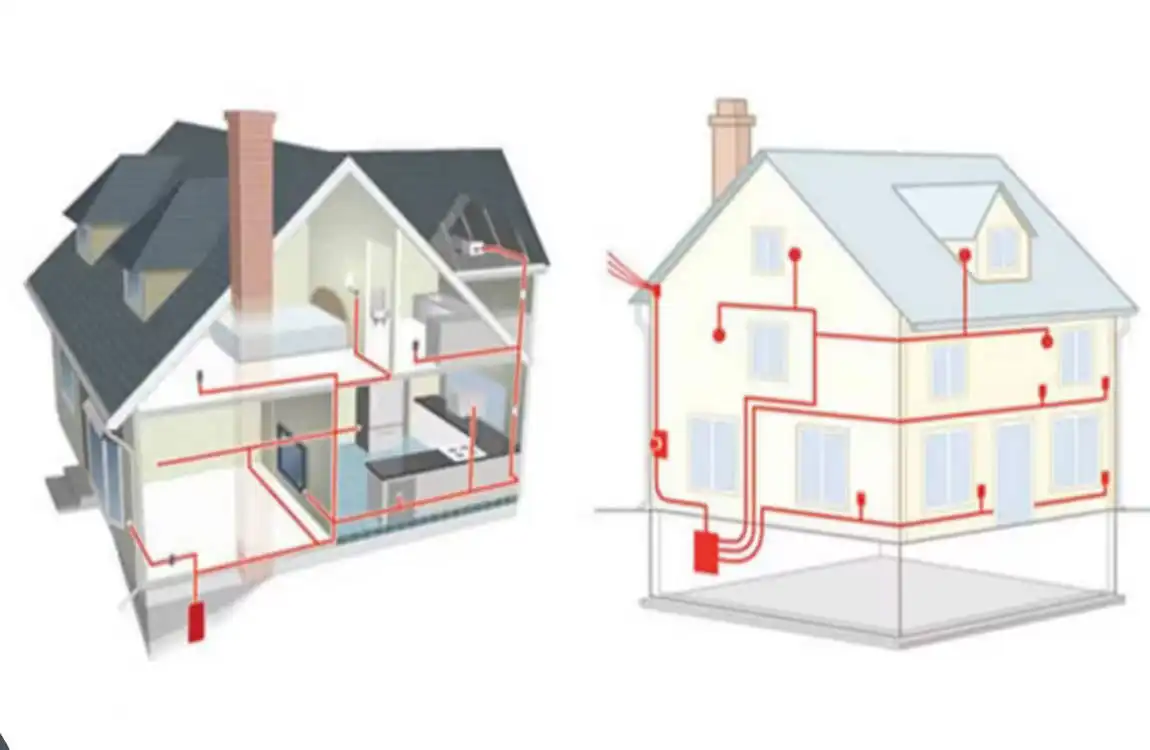
Preparation is key to a smooth rewiring project. Start by assessing your current setup. Walk through your home and note every outlet, switch, and appliance. Calculate the electrical load—how much power do you really need? Tools like online calculators can help you figure this out.
Next, create a wiring diagram. Sketch out your home’s layout, marking where new circuits will go. This plan acts like a roadmap, ensuring you don’t miss spots like the kitchen or basement. Involve your family—maybe they have ideas for adding outlets in convenient places.
Permits are non-negotiable. Contact your local building department to get the green light. They’ll outline requirements based on codes. Also, inform your utility provider; they might need to disconnect power temporarily.
Finally, power down safely. Flip the main breaker and use a voltage tester on every circuit. Isolate areas by turning off individual breakers. Clear workspaces by moving furniture— it reduces tripping hazards. How prepared are you feeling? A solid plan sets you up for success.
Step-by-Step Guide: How to Rewire a House
Alright, let’s get to the heart of it: the actual steps for how to rewire a house. We’ll take it slow, breaking each part into manageable chunks. Remember, safety first— if you’re unsure, call a pro.
Turn Off Power and Verify
Power off is your starting point. Head to your main breaker panel, usually in the basement or garage. Flip the main switch to “off.” But don’t stop there—verify with a voltage tester. Touch it to outlets and wires; no reading means it’s safe.
Why double-check? Residual power can lurk in unexpected places. Test multiple spots, and if you’re working on a large home, consider locking the panel to prevent accidental flips. You’ve got this—stay vigilant.
Remove Old Wiring and Fixtures
With power confirmed off, start dismantling. Unscrew outlets and switches carefully. Pull out old wires, clipping them if needed. Use pliers for stubborn fixtures, but avoid yanking— that could damage walls.
Dispose responsibly. Old wires might contain hazardous materials like lead, so check local recycling rules. Bag everything neatly to keep your workspace clean. This step clears the slate for new installs.
Install New Wiring
Now, run those fresh cables. Use fish tape to thread wires through walls— it’s like fishing for electricity. Secure them with staples every few feet, following code spacing.
Route wisely: avoid sharp bends that stress wires. Label ends with tape, noting destinations like “kitchen outlet.” This saves confusion later. Picture your home’s layout— where do you need power most?
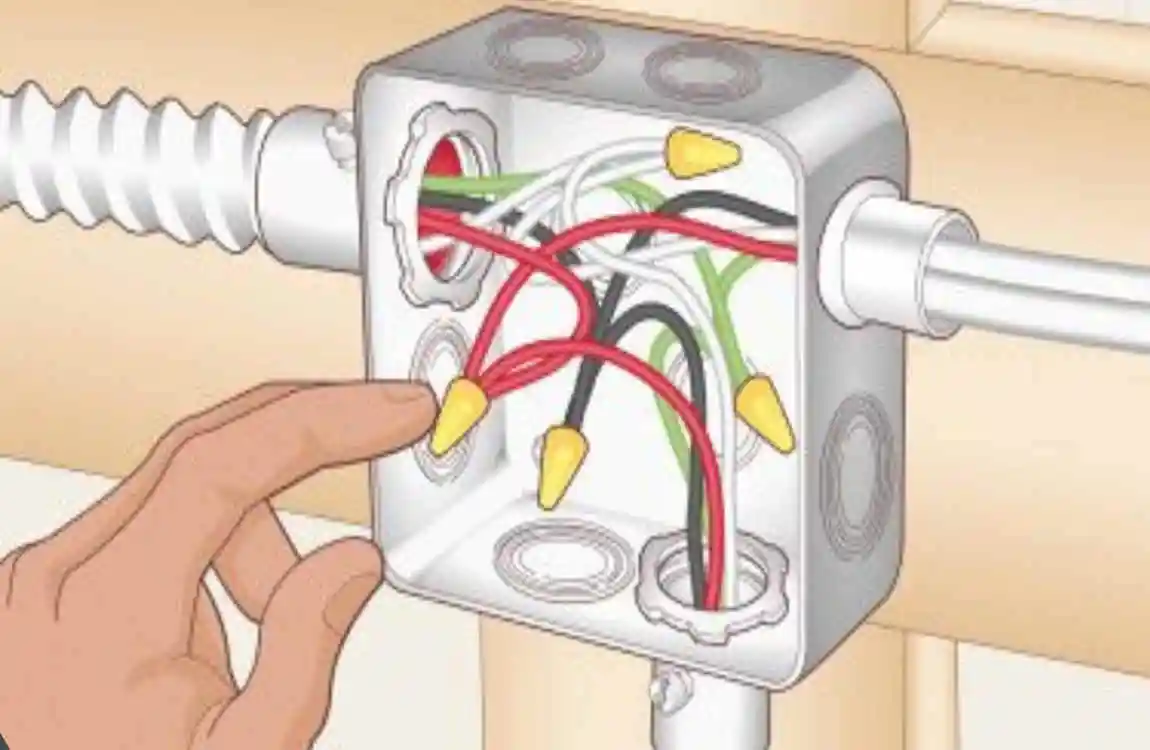
Connect Outlets, Switches, and Fixtures
Time to hook things up. For outlets, strip wire ends and attach to screws: black to brass, white to silver, green to ground. Switches follow similar logic—connect the hot wire to the top screw.
Grounding is vital—it directs stray current safely away. Bond metal parts together for extra protection. Typical setups include GFCI outlets in bathrooms for moisture safety. Test fits before finalizing.
Install New Breaker Panel or Upgrade Existing One
If your old panel is outdated, upgrade now. Panels wear out after 20-30 years, especially with added loads. Choose one with ample slots for future expansions.
Connect circuits methodically: shut off main power, attach wires to breakers, and snap them in. Label each for easy reference. This upgrade future-proofs your home—smart move!
Test All Connections
Grab a multimeter and check. Test for continuity (steady beeps mean good flow), shorts (no reading is ideal), and grounding (low resistance shows it’s solid).
Go room by room, plugging in testers. If something’s off, retrace your steps. This verifies your work before powering up.
Restore Power and Conduct Final Safety Checks
Flip the main breaker back on, one circuit at a time. Listen for odd noises or watch for sparks—none? Good sign.
Run load tests: plug in appliances and monitor for trips or home heat. Sniff for burning smells. If all clear, you’re set. Pat yourself on the back—you’ve rewired safely!
Electrical Codes and Regulations to Know When Rewiring
Codes keep things standard. The National Electrical Code (NEC) sets U.S. guidelines, updated every few years. It covers wire sizes, circuit capacities, and safety features like AFCI breakers to prevent arcs.
Local codes might add twists, like requiring permits for any wiring changes. Inspections ensure compliance— an inspector checks your work post-install.
Non-compliance? It could nullify insurance claims or hurt resale value. Buyers love code-compliant homes. Stay informed; it protects you and your family home.
Common Mistakes to Avoid When Rewiring a House
Even pros slip up, so watch out. Here’s a list of pitfalls to dodge:
- Overloading circuits: Don’t cram too many outlets on one line—it trips breakers constantly.
- Skipping permits and inspections: This leads to fines or unsafe setups.
- Using incorrect wire gauges: Thin wires overheat; match gauge to amp needs.
- Poor grounding and loose connections: These cause shocks or fires—tighten everything.
Avoid these by planning ahead. Double-check your work, and if in doubt, consult an expert. What’s one mistake you’ve seen in DIY projects?